//test2.c
//功能:从0开始每秒打印
#include <stdio.h>
#include <unistd.h>
int aaa();
int bbb(int n);
int main()
{
    aaa();
}

int aaa()
{
    bbb(0);
}

int bbb(int n)
{
    for(int i = n; i < n+10000; i++)
    {
        printf("i:%d\n", i);
        n++;
        sleep(1);
    }
}
gcc -g -o test2 test2.c
./test2
//结果
:0
i:1
i:2
i:3
i:4
i:5
i:6
i:7
......
在终端窗口运行编译好的程序
./test2
在另一个终端窗口,使用ps命令找到正在运行程序的进程ID,其中进程ID是第二个
ps aux | grep test2
//结果如下,其中正在运行程序的进程ID是15554
username   15554  0.0  0.0   2776  1408 pts/1    S+   22:38   0:00 ./test2
username   15557  0.0  0.0  12192  2432 pts/2    S+   22:39   0:00 grep --color=auto test
使用GDB附加到正在运行的程序上
sudo gdb test2 -p 15554
这里的sudo加不加看环境,有些不用加
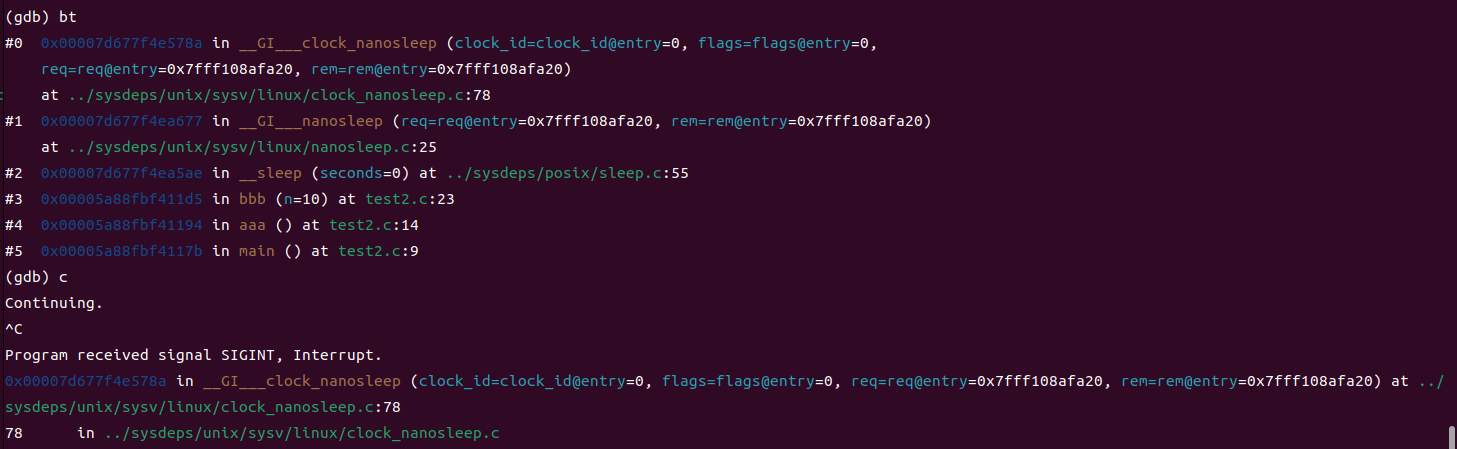
在GDB中,你可以使用常用的调试命令如bt(查看调用堆栈),print(打印变量值),C++ontinue(继续执行程序),等等
这里因为sleep延时,直接continue后,test2继续运行,gdb这里卡住了,可以用CTRL-C重新中断
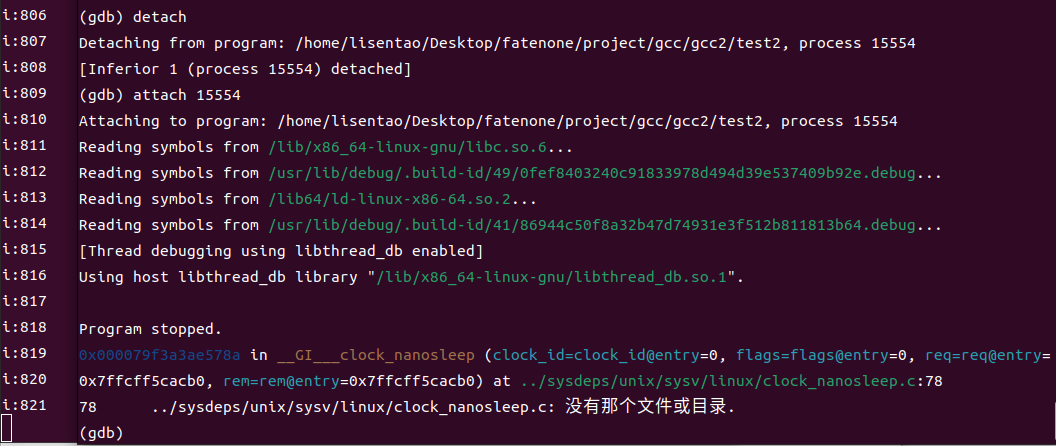
| 命令 | 解析 |
|---|---|
| detach | 直接使用detach命令,可以从进程中分离GDB并让程序继续运行 |
| attach PID | 重新将GDB附加到某个进程上 |
#include <stdio.h>
#include <stdlib.h>
#include <unistd.h>

int main()
{
        printf("begin\n");

        if ( fork() != 0 )
        {
                printf("我是父进程:进程pid=%d,父进程ppid=%d\n",getpid(),getppid());

                int ii;
                for(ii=0; ii<200; ii++)
                {
                        printf("父进程ii=%d\n",ii);
                        sleep(1);
                }
                exit(0);
                }

        else
        {
                printf("我是子进程:进程pid=%d,父进程ppid=%d\n",getpid(),getppid());
                int jj;
                for(jj=0; jj<200; jj++)
                {
                        printf("子进程jj=%d\n",jj);
                        sleep(1);
                }
                exit(0);
        }
}
gcc -g -o test3 test3.c
./test3
//运行结果
我是父进程:进程pid=5003,父进程ppid=4675
父进程ii=0
我是子进程:进程pid=5004,父进程ppid=5003
子进程jj=0
父进程ii=1
子进程jj=1
子进程jj=2
父进程ii=2
子进程jj=3
父进程ii=3
子进程jj=4
父进程ii=4
父进程ii=5
子进程jj=5
子进程jj=6
父进程ii=6
子进程jj=7
父进程ii=7
父进程ii=8
子进程jj=8
......


//开始调试
gdb test3
| 命令 | 解析 |
|---|---|
| set follow-fork-mode child | 设置追踪子进程。gdb 默认调试的是父进程,如果想调试子进程,那么在用gdb调试的时候要增加。该命令要在子进程运行前设置 |
| set detach-on-fork on/off | 继续其他进程/停止其他进程。当我们调试某个进程的时候,设置别的进程是否运行。默认是on,表示调试当前进程的时候,其他的进程继续运行。off,表示调试当前进程,其他的进程被 gdb 挂起。 |
| info inferior | 通过查看可以调试的进程,方便后面切换进程 |
| inferior processNum | 可以通过 info inferior 来查看可以调试的进程,当需要切换调试的进程时,根据processNum进行切换。这里的processNum是gdb自己排的进程编号,不是进程ID |
以下程序未设置命令,因此默认调试父进程,并且调试的时候子进程是运行的
eading symbols from test3...
(gdb) b 7
Breakpoint 1 at 0x1216: file test3.c, line 7.
(gdb) run
Starting program: /home/lisentao/Desktop/fatenone/project/gcc/gdb2/test3
[Thread debugging using libthread_db enabled]
Using host libthread_db library "/lib/x86_64-Linux-gnu/libthread_db.so.1".

Breakpoint 1, main () at test3.c:7
7            printf("begin\n");
(gdb) n
begin
9            if ( fork() != 0 )
(gdb) n
[Detaching after fork from child process 5242]
我是子进程:进程pid=5242,父进程ppid=5239
子进程jj=0
11                    printf("我是父进程:进程pid=%d,父进程ppid=%d\n",getpid(),getppid());
(gdb) 子进程jj=1
子进程jj=2
子进程jj=3
子进程jj=4
子进程jj=5
子进程jj=6
使用set follow-fork-mode child命令调试子进程,并使用set detach-on-fork off命令挂起父进程,随后再切换调试父进程
Reading symbols from test3...
(gdb) b 7
Breakpoint 1 at 0x1216: file test3.c, line 7.
(gdb) set follow-fork-mode child
(gdb) set detach-on-fork off
(gdb) r
Starting program: /home/lisentao/Desktop/fatenone/project/gcc/gdb2/test3
[Thread debugging using libthread_db enabled]
Using host libthread_db library "/lib/x86_64-linux-gnu/libthread_db.so.1".

Breakpoint 1, main () at test3.c:7
7            printf("begin\n");
(gdb) n
begin
9            if ( fork() != 0 )
(gdb) n
[Attaching after Thread 0x7ffff7fa9740 (LWP 5333) fork to child process 5336]
[New inferior 2 (process 5336)]
Reading symbols from /usr/lib/debug/.build-id/49/0fef8403240c91833978d494d39e537409b92e.debug...
Reading symbols from /usr/lib/debug/.build-id/41/86944c50f8a32b47d74931e3f512b811813b64.debug...
[Thread debugging using libthread_db enabled]
Using host libthread_db library "/lib/x86_64-linux-gnu/libthread_db.so.1".
[Switching to Thread 0x7ffff7fa9740 (LWP 5336)]
main () at test3.c:9
9            if ( fork() != 0 )
(gdb) n
24                    printf("我是子进程:进程pid=%d,父进程ppid=%d\n",getpid(),getppid());
(gdb) n
我是子进程:进程pid=5336,父进程ppid=5333
26                    for(jj=0; jj<200; jj++)
(gdb) n
28                            printf("子进程jj=%d\n",jj);
(gdb) n
子进程jj=0
29                            sleep(1);
(gdb) n
26                    for(jj=0; jj<200; jj++)
(gdb) info inferior
  Num  Description       Connection           Executable
  1    process 5333      1 (Native)           /home/lisentao/Desktop/fatenone/project/gcc/gdb2/test3
* 2    process 5336      1 (native)           /home/lisentao/Desktop/fatenone/project/gcc/gdb2/test3
(gdb) inferior 1
[Switching to inferior 1 [process 5333] (/home/lisentao/Desktop/fatenone/project/gcc/gdb2/test3)]
[Switching to thread 1.1 (Thread 0x7ffff7fa9740 (LWP 5333))]
#0  arch_fork (ctid=0x7ffff7fa9a10) at ../sysdeps/unix/sysv/linux/arch-fork.h:52
52    ../sysdeps/unix/sysv/linux/arch-fork.h: 没有那个文件或目录.
(gdb) info inferior
  Num  Description       Connection           Executable
* 1    process 5333      1 (native)           /home/lisentao/Desktop/fatenone/project/gcc/gdb2/test3
  2    process 5336      1 (native)           /home/lisentao/Desktop/fatenone/project/gcc/gdb2/test3
(gdb) n
56    in ../sysdeps/unix/sysv/linux/arch-fork.h
(gdb) n
__GI__Fork () at ../sysdeps/nptl/_Fork.c:29
29    ../sysdeps/nptl/_Fork.c: 没有那个文件或目录.
(gdb) n
50    in ../sysdeps/nptl/_Fork.c
(gdb) n
__libc_fork () at ./posix/fork.c:75
75    ./posix/fork.c: 没有那个文件或目录.
(gdb) n
113    in ./posix/fork.c
(gdb) n
126    in ./posix/fork.c
(gdb) n
128    in ./posix/fork.c
(gdb) n
132    in ./posix/fork.c
(gdb) n
main () at test3.c:9
9            if ( fork() != 0 )
(gdb) n
11                    printf("我是父进程:进程pid=%d,父进程ppid=%d\n",getpid(),getppid());
(gdb) n
我是父进程:进程pid=5333,父进程ppid=5328
14                    for(ii=0; ii<200; ii++)
(gdb) n
16                            printf("父进程ii=%d\n",ii);
(gdb) n
父进程ii=0
17                            sleep(1);
(gdb) n
n14                    for(ii=0; ii<200; ii++)
(gdb) n
16                            printf("父进程ii=%d\n",ii);
(gdb)
#include <stdio.h>
#include <unistd.h>
#include <pthread.h>

#define MAX 50
//全局变量
int number;
//创建一把互斥锁
pthread_mutex_t mutex;

void* funcA_num(void* arg)
{
    for(int i=0; i<MAX; ++i)
    {
        pthread_mutex_lock(&mutex);
        number++;
        printf("Thread A, id = %lu, number = %d\n", pthread_self(), number);
        pthread_mutex_unlock(&mutex);
        sleep(1);
    }
    return NULL;
}

void* funcB_num(void* arg)
{
    for(int i=0; i<MAX; ++i)
    {
        pthread_mutex_lock(&mutex);
    number++;
        printf("Thread B, id = %lu, number = %d\n", pthread_self(), number);
        pthread_mutex_unlock(&mutex);
        sleep(1);
    }
    return NULL;
}

int main(int argc, const char* argv[])
{
    pthread_t p1, p2;

    // 初始化互斥锁
    pthread_mutex_init(&mutex, NULL);

    // 创建两个子线程
    pthread_create(&p1, NULL, funcA_num, NULL);
    pthread_create(&p2, NULL, funcB_num, NULL);

    for(int k = 0; k < MAX; k++)
    {
        pthread_mutex_lock(&mutex);
    number++;
        printf("Thread Main, id = %lu, number = %d\n", pthread_self(), number);
        pthread_mutex_unlock(&mutex);
        sleep(1);
    }

    // 阻塞,资源回收
    pthread_join(p1, NULL);
    pthread_join(p2, NULL);

    // 销毁互斥锁
    // 线程销毁之后, 再去释放互斥锁
    pthread_mutex_destroy(&mutex);

    return 0;
}
gcc -g -o test2 test2.c
./test2
//结果
:0
i:1
i:2
i:3
i:4
i:5
i:6
i:7
......
0| 命令 | 解析 |
|---|---|
| ps -aL | grep xxx | 查看轻量级进程。轻量级的进程就是线程:p——process:进程; s——state:状态;a——all:全部;L——light:轻 |
| pstree -p 主线程id | 主线程和子线程的关系用树形展开 |
gcc -g -o test2 test2.c
./test2
//结果
:0
i:1
i:2
i:3
i:4
i:5
i:6
i:7
......
1| 命令 | 解析 |
|---|---|
| info threads | 查看线程 |
| thread 线程号 | 切换到某个线程,这个线程号可以查看info threads |
| set scheduler-locking on | 可以用来锁定当前线程,只观察这个线程的运行情况。当锁定这个线程时,其他线程就处于了暂停状态,也就是说你在当前线程执行 next、step、until、finish、return 命令时,其他线程是不会运行的。需要注意的是,你在使用 set scheduler-locking on/step 选项时要确认下当前线程是否是你期望锁定的线程,如果不是,可以使用 thread <线程编号> 切换到你需要的线程,然后再进行锁定。 |
| set scheduler-locking step | 也是用来锁定当前线程,当且仅当使用 next 或 step 命令做单步调试时会锁定当前线程,如果使用 until、finish、return 等线程内的非单步调试命令,其他线程还是有机会运行的。相比较 on 选项值,step 选项值给为单步调试提供了更加精细化的控制,因为通常我们只希望在单步调试时,不希望其他线程对当前调试的各个变量值造成影响。 |
| set scheduler-locking off | 关闭锁定当前线程,所有的线程都会执行。 |
gcc -g -o test2 test2.c
./test2
//结果
:0
i:1
i:2
i:3
i:4
i:5
i:6
i:7
......
2有时候写程序会出现 coredump 的错误,也就是内存溢出,程序挂掉。要去查看是程序中的那个地方导致了内存溢出,可以在GDB调试的时候加上 core 文件,core 文件里面记录了程序挂掉的一些重要信息。
| 命令 | 解析 |
|---|---|
| ulimt -a | 看系统参数,core文件的默认大小是 0 |
| ulimit -c unlimited | 将core文件的大小修改为无限制 |
gdb调试正在运行中的程序_gdb调试正在运行的程序-CSDN博客
深入理解GDB调试:多进程、多线程及核心文件剖析-CSDN博客
GDB-2——GDB调试多线程 - Hello-World3 - 博客园
Linux多线程调试没那么难,别就会一个printf! - 知乎