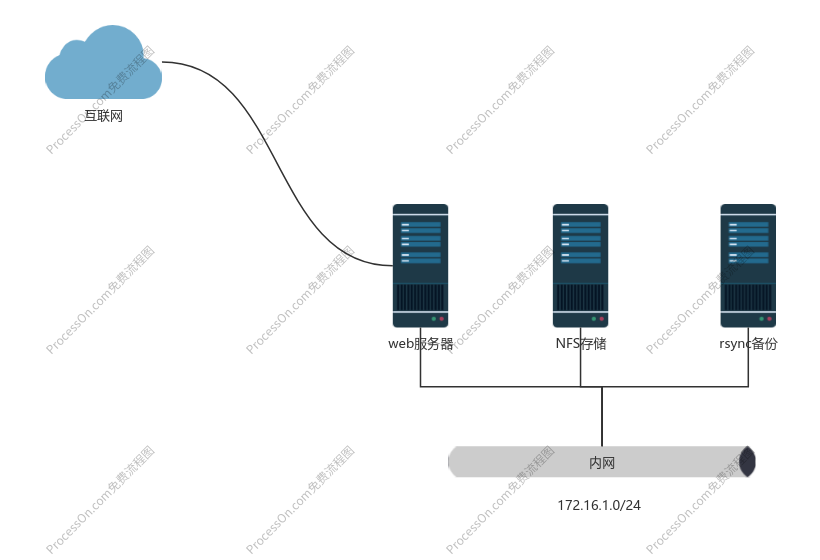
1.对NFS服务器上的静态资源实时备份(inotify+rsynC++)
# 外网地址                内网地址          主机名
192.168.122.207   172.16.1.207  web-test-209
192.168.122.231  172.16.1.231  nfs-test-231
192.168.122.241  172.16.1.241  rsync-test-241
rsync-test-241服务器上搭建rsync[root@rsync-test-241 ~]# yum install rsync -y
/etc/rsyncd.conf[root@rsync-test-241 ~]# vim /etc/rsyncd.conf
[root@rsync-test-241 ~]# cat /etc/rsyncd.conf
uid = rsync
gid = rsync
fake super = yes
use chroot = no
max connections = 200
pid file = /var/run/rsyncd.pid
lock file = /var/run/rsync.lock
log file = /var/log/rsyncd.log
ignore errors
read only = false
list = false
hosts allow = 172.16.1.0/24
hosts deny = 0.0.0.0/32
auth users = rsync_backup
secrets file = /etc/rsync.password
[backup-nfs]
comment = This is nfs backup!
path = /backup/
配置文件解读
| 配置参数 | 参数说明 |
|---|---|
| uid = rsync | 指定rsync服务运行的时候,向磁盘进行读取和写入操作的操作者 |
| gid = rsync | 指定rsync服务运行的时候,向磁盘进行读取和写入操作的操作者 |
| use chroot = no | 进行数据同步存储时,安全相关参数,默认内网进行数据同步,可以关闭 |
| max connections = 200 | 定义向备份服务器进行数据存储的并发连接数 |
| timeout = 300 | 定义与备份服务器建立的网络连接,在多长时间没有数据传输时,就释放连接 |
| pid file = /var/run/rsyncd.pid | 服务程序运行时,会将进程的pid信息存储到一个指定的pid文件中 |
| lock file = /var/run/rsync.lock | 定义锁文件,主要用于配合max connections 参数,当达到最大连接就禁止继续访问 |
| log file = /var/log/rsyncd.log | 定义服务的日志文件保存路径信息 |
| [backup] | 指定备份目录的模块名称信息 |
| path = /backup | 指定数据进行备份的目录信息 |
| ignore errors | 在进行数据备份传输过程过程中,忽略一些I/O产生的传输错误 |
| read only = false | 设置对备份的目录的具有读写权限,即将只读模式进行关闭 |
| list = false | 确认是否可以将服务配置的模块信息,在客户端可以查看显示 |
| hosts allow = 172.16.1.0/24 | 设置备份目录允许进行网络数据备份的主机地址或网段信息,即设置白名单 |
| hosts deny = 0.0.0.0/32 | 设置备份目录禁止进行网络数据备份的主机地址或网段信息,即设置黑名单 |
| auth users = rsync_backup | 指定访问备份数据目录的认证用户信息,为虚拟定义的用户,不需要进行创建 |
| secrets file = /etc/rsync.password | 设置访问备份数据目录进行认证用户的密码文件信息,会在文件中设置认证用户密码信息 |
| [backup] | 指定模块名称,便于日后维护 |
| path=/backup | 在当前模块中,Daemon使用的文件系统或目录,注意目录权限和配置文件权限一直,防止读写出问题 |
| #exclude= | 排除文件或目录,相对路径 |
| [ftp] | 还可以添加其他模块 |
创建用户
[root@rsync-test-241 ~]# useradd rsync -s /sbin/nologin -M
[root@rsync-test-241 ~]# id rsync
uid=1000(rsync) gid=1000(rsync) 组=1000(rsync)
创建目录,修改属性
[root@rsync-test-241 ~]# mkdir /backup
[root@rsync-test-241 ~]# chown -R rsync.rsync /backup/
[root@rsync-test-241 ~]# ls -ld /backup/
drwxr-xr-x 2 rsync rsync 6 11月 15 16:19 /backup/
创建认证文件,授权
[root@rsync-test-241 ~]# echo "rsync_backup:mima666" > /etc/rsync.password
[root@rsync-test-241 ~]# cat /etc/rsync.password
rsync_backup:mima666
[root@rsync-test-241 ~]# chmod 600 /etc/rsync.password
[root@rsync-test-241 ~]# ll /etc/rsync.password
-rw------- 1 root root 21 11月 15 16:22 /etc/rsync.password
[root@rsync-test-241 ~]# systemctl start rsyncd
[root@rsync-test-241 ~]# systemctl enable rsyncd
Created symlink from /etc/systemd/system/multi-user.target.wants/rsyncd.service to /usr/lib/systemd/system/rsyncd.service.
[root@rsync-test-241 ~]# systemctl status rsyncd
● rsyncd.service - fast remote file copy program daemon
   Loaded: loaded (/usr/lib/systemd/system/rsyncd.service; enabled; vendor preset: disabled)
   Active: active (running) since 五 2024-11-15 16:24:12 CST; 41s aGo
 Main PID: 2411 (rsync)
   CGroup: /system.slice/rsyncd.service
           └─2411 /usr/bin/rsync --daemon --no-detach

11月 15 16:24:12 rsync-test-241 systemd[1]: Started fast remote file copy program daemon.
[root@rsync-test-241 ~]#
[root@rsync-test-241 ~]# ps -ef|grep rsync
root      2411     1  0 16:24 ?        00:00:00 /usr/bin/rsync --daemon --no-detach
root      2450  1928  0 16:26 pts/1    00:00:00 grep --color=auto rsync
[root@rsync-test-241 ~]# netstat -tnlp | grep rsync
tcp        0      0 0.0.0.0:873             0.0.0.0:*               LISTEN      2411/rsync
tcp6       0      0 :::873                  :::*                    LISTEN      2411/rsync
[root@rsync-test-241 ~]#
nfs-test-231服务器上运行rsync[root@nfs-test-231 ~]# yum install rsync -y
[root@nfs-test-231 ~]# echo 'mima666' > /etc/rsync.password
[root@nfs-test-231 ~]# cat /etc/rsync.password
mima666
[root@rsync-test-241 ~]# yum install rsync -y
0client > server 、数据推送
[root@rsync-test-241 ~]# yum install rsync -y
1
[root@rsync-test-241 ~]# yum install rsync -y
2[root@rsync-test-241 ~]# yum install rsync -y
3验证rsync服务端接收到了文件
[root@rsync-test-241 ~]# yum install rsync -y
4nfs-test-231服务器上部署inotify[root@rsync-test-241 ~]# yum install rsync -y
5检测共享文件夹,只要有了数据变化,立即触发rsync备份
[root@nfs-test-231 ~]# vim rsync_nginx.sh
[root@nfs-test-231 ~]# cat rsync_nginx.sh
[root@rsync-test-241 ~]# yum install rsync -y
6[root@rsync-test-241 ~]# yum install rsync -y
7web-test-207服务器上更新文件[root@rsync-test-241 ~]# yum install rsync -y
8nfs-test-231上查看同步日志[root@rsync-test-241 ~]# yum install rsync -y
9rsync-test-241上查看是否同步[root@rsync-test-241 ~]# vim /etc/rsyncd.conf
[root@rsync-test-241 ~]# cat /etc/rsyncd.conf
uid = rsync
gid = rsync
fake super = yes
use chroot = no
max connections = 200
pid file = /var/run/rsyncd.pid
lock file = /var/run/rsync.lock
log file = /var/log/rsyncd.log
ignore errors
read only = false
list = false
hosts allow = 172.16.1.0/24
hosts deny = 0.0.0.0/32
auth users = rsync_backup
secrets file = /etc/rsync.password
[backup-nfs]
comment = This is nfs backup!
path = /backup/
0[root@rsync-test-241 ~]# vim /etc/rsyncd.conf
[root@rsync-test-241 ~]# cat /etc/rsyncd.conf
uid = rsync
gid = rsync
fake super = yes
use chroot = no
max connections = 200
pid file = /var/run/rsyncd.pid
lock file = /var/run/rsync.lock
log file = /var/log/rsyncd.log
ignore errors
read only = false
list = false
hosts allow = 172.16.1.0/24
hosts deny = 0.0.0.0/32
auth users = rsync_backup
secrets file = /etc/rsync.password
[backup-nfs]
comment = This is nfs backup!
path = /backup/
1